Sunday, August 31, 2014
I'm Back~~
I am finally getting back to my poor neglected blog. Fresh start with a new name and a new venture. I have jumped into the world of running a booth at an antique/craft mall. My partner in crime (or business) is my awesome Mom. We have been doing a lot of "treasure" hunting and finding lots of things to put into our booth as is, and finding lots of things to refurbish, refresh or reupholster. I have a vision of what I want it to be and become, but for now it is what it is. I am really excited, as I have been wanting to do something like this for a very long time. Now that my kids are getting older it is allowing me to take a leap into something for "me"! I can't wait to share with you some of the transformations of our finds, and share some of our creations with you.


Tuesday, February 28, 2012
Gardening Idea
Saw this on a friend's Facebook page~ I totally love it, now I just need a log to do this with.

Sunday, February 12, 2012
Conservation Heart Cookies


I think these came out cute. They are sugar cookies, iced with a royal icing. I then rolled some fondant and cut out the letters with cookie cutters made by Wilton.
Hope you like the idea~
Saturday, February 11, 2012
Valentine's Candy Jars

Anyways~ you'll need tiny clay pots and saucers, a glass fish bowl type vase and some wooden knobs. Paint the pots any color you choose. I picked black sequin by Anita's. I then put dots on some of them in white. The other two I just painted the edges of the pots and didn't make dots. Glue the knob on top (or really the bottom) of the saucer with E6000 and paint it when it's set. Glue the glass bowl to the bottom of the clay pot. The saucer becomes the lid. I cut out the word "Candy" in vinyl on my cricut machine and placed it on the glass. Fill with some shredded paper and candy, wrap a cute ribbon around it and you have a darling little gift.
Thursday, February 2, 2012
Groundhog Day craft
This is a cute, easy craft for kids....


You will need one large heart in a brown, 3 small ones~one in the same brown paper, one in white and one in black. A pair of wiggle eyes and some strips of paper in white or cream. Cut the small brown heart in half for the ears. The placement is pretty easy to understand from the picture. If you don't have any wiggle eyes you could just cut some white circles and some smaller black ones.
found on Lucky Me
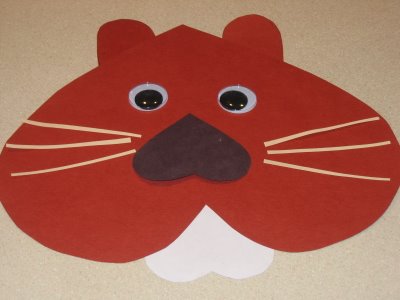

You will need one large heart in a brown, 3 small ones~one in the same brown paper, one in white and one in black. A pair of wiggle eyes and some strips of paper in white or cream. Cut the small brown heart in half for the ears. The placement is pretty easy to understand from the picture. If you don't have any wiggle eyes you could just cut some white circles and some smaller black ones.
found on Lucky Me
Groundhog Day Cupcakes....

Looks like they would be easy to re-create with little candy hearts for the teeth.
And candy eyes,a chocolate chip for his nose, a little bit of piping with a pasty bag for the cheeks and some chocolate sprinkles for his head....love em!
Monday, January 30, 2012
Vinyl Wall Tree

Thursday, January 19, 2012
White Chocolate covered Cherries
Saw this on a blog somewhere....can't remember. But I saved the picture.
So cute and easy.
just dip clean, dry cherries into melted white chocolate. Let cool. Make face with chocolate chips melted in a zip lock bag, snip a tiny piece off the corner and pipe choc. to make eyes,mouth. Use a little of the white melted chocolate mixed with food coloring to make the noses. You could do this in a bag or even just with a toothpick dabbed into it (since you won't need to do as many dots).
So cute and easy.

just dip clean, dry cherries into melted white chocolate. Let cool. Make face with chocolate chips melted in a zip lock bag, snip a tiny piece off the corner and pipe choc. to make eyes,mouth. Use a little of the white melted chocolate mixed with food coloring to make the noses. You could do this in a bag or even just with a toothpick dabbed into it (since you won't need to do as many dots).
Saturday, January 14, 2012

Thursday, January 12, 2012
Bird treats
Found this on the Betty Crocker website

Take a ice cram cone and break off the tip.
Use a pipe cleaner or twine to hang. Either bend the pipe cleaner into a little
"ball" on one end and insert through hole. Or make a large knot on one end of the twine...
Spread peanut butter on the outside of the cone, roll in a mixture of bird seed and cereal.... hang outside for our feathered friends!
Source: bettycrocker.com via Michelle on Pinterest
Take a ice cram cone and break off the tip.
Use a pipe cleaner or twine to hang. Either bend the pipe cleaner into a little
"ball" on one end and insert through hole. Or make a large knot on one end of the twine...
Spread peanut butter on the outside of the cone, roll in a mixture of bird seed and cereal.... hang outside for our feathered friends!
White Chili
This is one of our favorite meals around our house when it's cold outside.
It is SUCH an easy recipe with very few ingredients...so that makes it even better.
This is NOT diet food, but it is a complete meal~
 OK~ here's the ingredients, but you have to know it's one of those recipes where there isn't a set measurement...just the amounts that work for me.
My rule is about 1 can of beans to 1 chicken breast...use what works for you.
about 1/2 cup chopped onion
4 chicken breasts, cooked and chopped or shredded
4 cans great northern beans
1/2--1/4 bottle of salsa....I use medium hot
about 2 cups water
jalapeno jack cheese~shredded about 1 - 1 1/2 cups
cumin
sour cream to top
In a large pot saute your onion until it is soft and translucent.
Add your chicken, beans, salsa and water. Throw in a good sprinkle of cumin.
Let it simmer for a while, about 30-40 minutes.
It will thicken a bit.
Then mix in the cheese...add more or less to your liking.
This will make it really thick and adds more flavor.
Serve with a dolop of sour cream on top and tortilla chips on the side.
Makes for great leftovers too!
It is SUCH an easy recipe with very few ingredients...so that makes it even better.
This is NOT diet food, but it is a complete meal~

My rule is about 1 can of beans to 1 chicken breast...use what works for you.
about 1/2 cup chopped onion
4 chicken breasts, cooked and chopped or shredded
4 cans great northern beans
1/2--1/4 bottle of salsa....I use medium hot
about 2 cups water
jalapeno jack cheese~shredded about 1 - 1 1/2 cups
cumin
sour cream to top
In a large pot saute your onion until it is soft and translucent.
Add your chicken, beans, salsa and water. Throw in a good sprinkle of cumin.
Let it simmer for a while, about 30-40 minutes.
It will thicken a bit.
Then mix in the cheese...add more or less to your liking.
This will make it really thick and adds more flavor.
Serve with a dolop of sour cream on top and tortilla chips on the side.
Makes for great leftovers too!
Monday, January 9, 2012
Looks like the "Snow is falling" --


found on CraftyStylish.com
Sunday, January 8, 2012

snowflake "curtain"
saw this on Pinterest~
put your kids (or yourself) to work cutting some snowflakes....

put your kids (or yourself) to work cutting some snowflakes....

Peanut Heart Wreath

Things you need:
Bag of shell on, unsalted peanuts
Coat hanger
Needle Nose Pliers
Things to do:
1. Open up your hanger and straighten it out as much as possible. Clip off the hook end and the corresponding twist at the other end.
2. At the center of the remaining piece of wire, create a loop by crossing the wires over.


5. Unbend the hook on one side and thread the peanuts onto the wire, working the wire through at the center indent of each peanut. Turn each peanut as you thread it on to nestle tightly against the previous one.

7. Repeat with the other side.
8. Slip one hook into the other to lock the two sides together and create the heart
9. Thread the piece of ribbon through the loop and tie off for hanging.

Saturday, January 7, 2012
Snowman Cupcakes
Aren't these the cutest!
Vanilla cupcakes, vanilla frosting, coconut(snow), fondant snowman, sweet-tart ear muffs, faces,etc. decorated with a food coloring pen~ love em'

Vanilla cupcakes, vanilla frosting, coconut(snow), fondant snowman, sweet-tart ear muffs, faces,etc. decorated with a food coloring pen~ love em'

Friday, January 6, 2012
Crochet Snowman Hat
Although I don't crochet, I thought I would include it for those who do. It's kinda cute, don't you think?

http://crochet.about.com/od/hats/a/baby-hat-with-snowman-earflaps.htm

http://crochet.about.com/od/hats/a/baby-hat-with-snowman-earflaps.htm
Thursday, January 5, 2012


Snowman soap

You'll need some regular white bar soap for this~
Grate the soap using a cheese grater*. When grating, lay a piece of wax paper or foil on your work surface.
Place grated soap into a bowl. Idea: use a disposable bowl for easy cleanup.
Add a small amount of water and mix with a spoon or popsicle stick. The soap will start to stick back together.
Take the soap out of the bowl and separate it into three sections. Roll each section into a ball and stack the balls to form a snowman. The balls should be slightly different sizes with the largest ball on the bottom and the smallest ball on top. If necessary, rub a little water on the soap where you are joining the pieces. This will help it stick.
Make sure you flatten the bottom ball so your snowman can stand without falling over.
Using a tooth pick, take a little paste food coloring out of the jar or squeeze a few drops of liquid food coloring out onto a paper plate, old plastic lid etc. or use washable paint. Paint a face and buttons on your snowman using a thin paint brush (liner brush).
Optional: Tie a small strip of fabric around your snowman's neck as a scarf. Be sure to remove the scarf if you decide to wash with your snowman.
Add a few drops of food coloring to the grated soap when you add the water if you want an object that is colored.
*Adult supervision is recommended when using a cheese grater.
Wednesday, January 4, 2012
Ribbon Storage-easy project

Subscribe to:
Posts (Atom)