Showing posts with label kid's project. Show all posts

Thursday, February 2, 2012

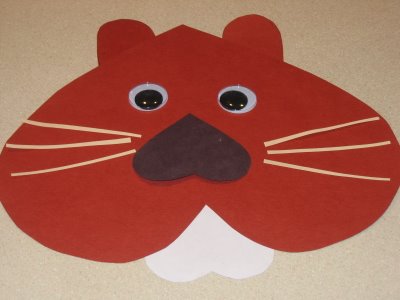
Groundhog Day craft

This is a cute, easy craft for kids....


You will need one large heart in a brown, 3 small ones~one in the same brown paper, one in white and one in black. A pair of wiggle eyes and some strips of paper in white or cream. Cut the small brown heart in half for the ears. The placement is pretty easy to understand from the picture. If you don't have any wiggle eyes you could just cut some white circles and some smaller black ones.

found on Lucky Me

Thursday, January 12, 2012

Bird treats

Found this on the Betty Crocker website


Take a ice cram cone and break off the tip.
Use a pipe cleaner or twine to hang. Either bend the pipe cleaner into a little
"ball" on one end and insert through hole. Or make a large knot on one end of the twine...
Spread peanut butter on the outside of the cone, roll in a mixture of bird seed and cereal.... hang outside for our feathered friends!

Monday, January 9, 2012

Looks like the "Snow is falling" --

Easy....you'll need white sticky cirles and dental floss. Attach the sticky circles (or dots) randomly along the length of some dental floss. When you have the length you want, snip it off and attach to the top of your window with tape or another sticky dot. When there is a slight breeze(even the air flow from your heater) they should move and create an illusion of snow outside.

found on CraftyStylish.com

Sunday, January 8, 2012

snowflake "curtain"

saw this on Pinterest~
put your kids (or yourself) to work cutting some snowflakes....

Thursday, January 5, 2012

Snowman soap


You'll need some regular white bar soap for this~

Grate the soap using a cheese grater*. When grating, lay a piece of wax paper or foil on your work surface.
Place grated soap into a bowl. Idea: use a disposable bowl for easy cleanup.
Add a small amount of water and mix with a spoon or popsicle stick. The soap will start to stick back together.
Take the soap out of the bowl and separate it into three sections. Roll each section into a ball and stack the balls to form a snowman. The balls should be slightly different sizes with the largest ball on the bottom and the smallest ball on top. If necessary, rub a little water on the soap where you are joining the pieces. This will help it stick.
Make sure you flatten the bottom ball so your snowman can stand without falling over.
Using a tooth pick, take a little paste food coloring out of the jar or squeeze a few drops of liquid food coloring out onto a paper plate, old plastic lid etc. or use washable paint. Paint a face and buttons on your snowman using a thin paint brush (liner brush).

Optional: Tie a small strip of fabric around your snowman's neck as a scarf. Be sure to remove the scarf if you decide to wash with your snowman.
Add a few drops of food coloring to the grated soap when you add the water if you want an object that is colored.

*Adult supervision is recommended when using a cheese grater.
Tuesday, January 3, 2012

melted snowman cookies


sugar cookie, icing and a marshmallow~ SO EASY

Snowmen

While we're on the subject of snowmen.... This is a craft I did with my kids when they were younger. They are fairly easy, younger ones may need a little more help with building.
You'll need styrofoam balls in two different sizes. Paper mache pulp, white glue( back to my tacky glue), toothpicks, some of your kids old socks (great use for those single ones that have lost their mate), misc. buttons, white,black and orange paint, and some little sticks.
Use 2-3 toothpicks and some tacky glue to connect a smaller styrofoam ball to the top of the larger one. Let them sit for a little bit, maybe 15 minutes. Mix the paper mache pulp according to the directions on the package. Smear it all over the snowmen. Ooop, almost forgot the nose...break a toothpick in half and insert it where you want your nose to be, usually about the center. Use the paper mache to build up the nose too. Let dry overnight. The next day paint it all white, add orange to the nose, black dots for the eyes and mouth. When the paint has dried you can glue buttons on the front, add scraps of material for a scarf or shawl. For the hats...cut off the toe of the sock, use a piece of thread or a strip of the sock and gather the top, leaving about and inch or so~snip the top into little strips, roll up the bottom edge and put it on your snowman. Last but not least, stick the little sticks into each side to make the arms. My kids still love to see these when I bring them out at Christmas.